UPDATE*
Hi readers. Just to update you guys that the servers listed below died. I did not renew their lease, cause I was trying to save some money. Servers ain’t cheap y’all. I did not know that people were actually using them. My bad.
I might set up new ones, but don’t count on it.
In the meantime, I recommend this one: https://adguard.com/en/adguard-dns/overview.html
UPDATE2*
I set up new dns adblock servers.
- 139.59.219.245
- 139.59.218.207
I can’t guarantee/promise to keep them running forever. But for now, you can just use them.
Settings Overview
As mentioned in previous of this article series, Adblock WiFi works by wiring up your Wifi router to a DNS adblock server. I have set up 2 such servers so you don’t have to. Update: these servers stopped working. My apologies.
dns1.bancuh.com (107.191.107.58)dns2.bancuh.com (192.249.62.155)
These DNS servers act similar to regular name resolvers, such as Google’s, OpenDNS’, or even your ISP’s DNS servers. All that they do, is to resolve domain-names to valid IP addresses.
However, I have also included a blacklist of known ad-servers to them. If you use my DNS Adblock servers instead of Google’s or your ISP’s DNS servers, you effectively block ads.
In this exercise, I’m going to teach you how to apply Adblock to your WiFi router, using my DNS adblock servers. Here’s what you need to change.
Client Devices:Wifi Setting:DNS
- LAN->DNS Servers = Automatic (IP Address of router)
On most devices, this is how it is as default, no changes needed. On PCs and Laptops, some folks change this setting to Google’s DNS servers. Please revert to Automatic. I’ll show an example for Windows 7.
Wifi Router Setting:LAN-DHCP-DNS Server
- Router Admin Page->LAN->DHCP->DNS Server = IP Address of router
On most routers, this is how it is as default, no changes needed. If this was altered for your router, please change it back. This ensures that LAN->DNS Servers settings on client devices are all pointed to you router IP automatically.
Wifi Router Setting:WAN-DNS Server
Router Admin Page->WAN->DNS Server = 107.191.107.58, 192.249.62.155
On most routers, this defaults to your ISP’s DNS servers, or Google’s. Change this to point to my DNS Adblock Servers.
Step-by-step walkthrough
I have already described to you the changes that you need to do, to adblock you Wifi, using my DNS Adblock servers. If you know your way around you router settings page, you don’t have to follow this section, you could just make those changes yourself.
The only thing that I could do here, is show you what I had to do with MY router. Most likely, we are using completely different router models, so you would not be able to follow the steps exactly, merely a guide.
Client Network/Wifi Settings
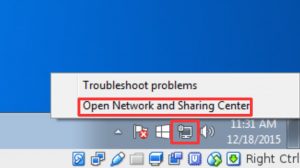
In Windows 7, from the desktop, right-click on the networking icon on the notification bar. Click open network and sharing center.
In the window that pops-up, click the entry under connections. Then click Details.
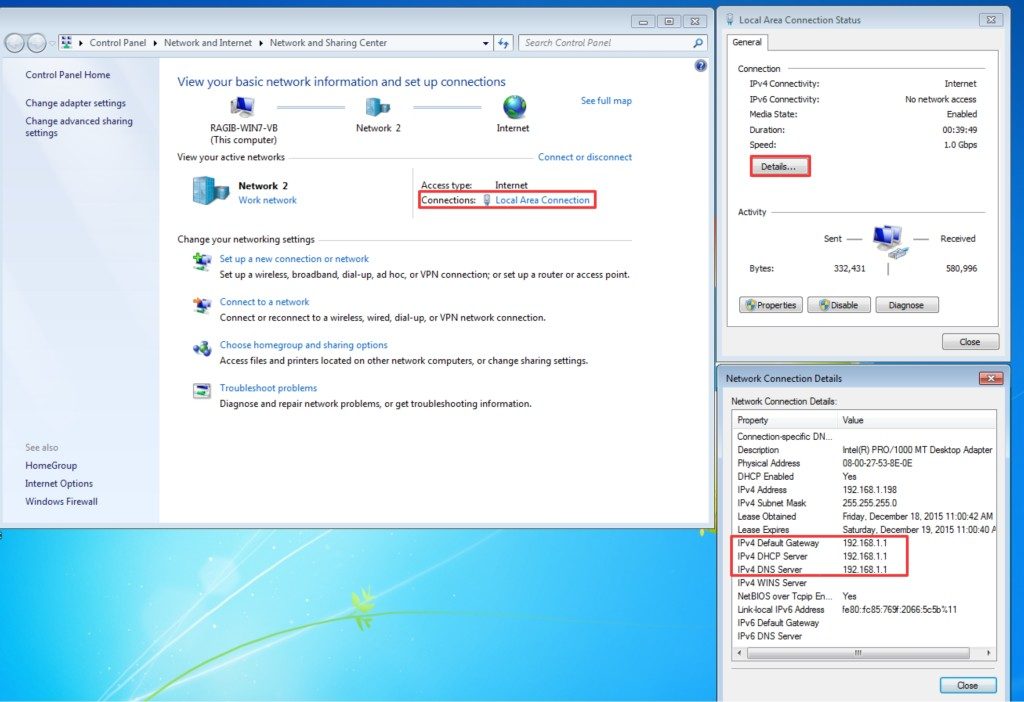
Look at IPV4 default gateway, this is the Local IP address of your router. Write it down. As you might have noticed in this example, IPV4 DNS server also points to the router. This is the default in most computers, and this is the correct setting for what we want to setup.
If you see that IPV4 DNS server points to IP addresses other than your router such as Google’s DNS servers (8.8.8.8, 8.8.4.4) or OpenDns servers, my guess is you must have followed other guides somewhere to make that change. You need to revert them back to your router.
Close the last pop-up window, click on Properties. In the new window, click IPV4 (the entry, not the checkbox) and then click properties. Check that the radio button “Obtain DNS server address automatically” is active. This sets IPV4 DNS setting to automatic.
Optionally, you might want to verify that your IP address setting is correct. What I have highlighted in the blue box below is what is common for most people, and can be left as is. If you have a need to use a specific IP address, use what’s best for you. I just need your IPV4 DNS setting to ‘automatically’ point to your router.
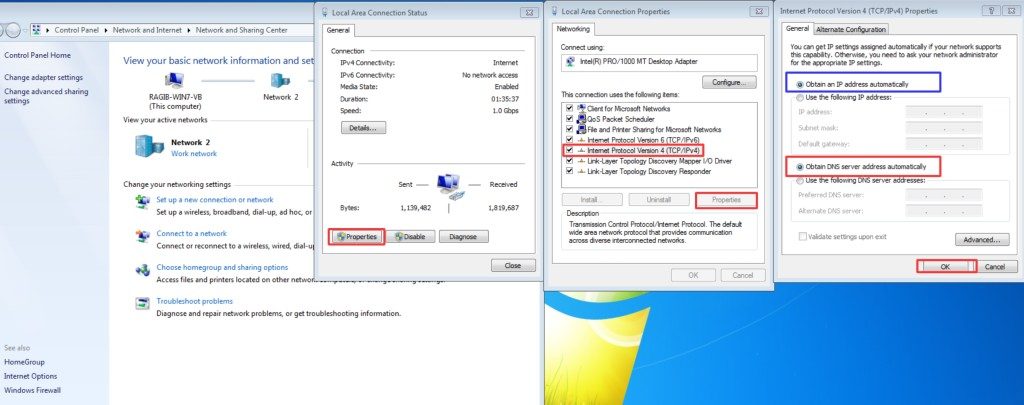
Click OK to apply changes and close all windows. Next, on to your Wifi router settings page.
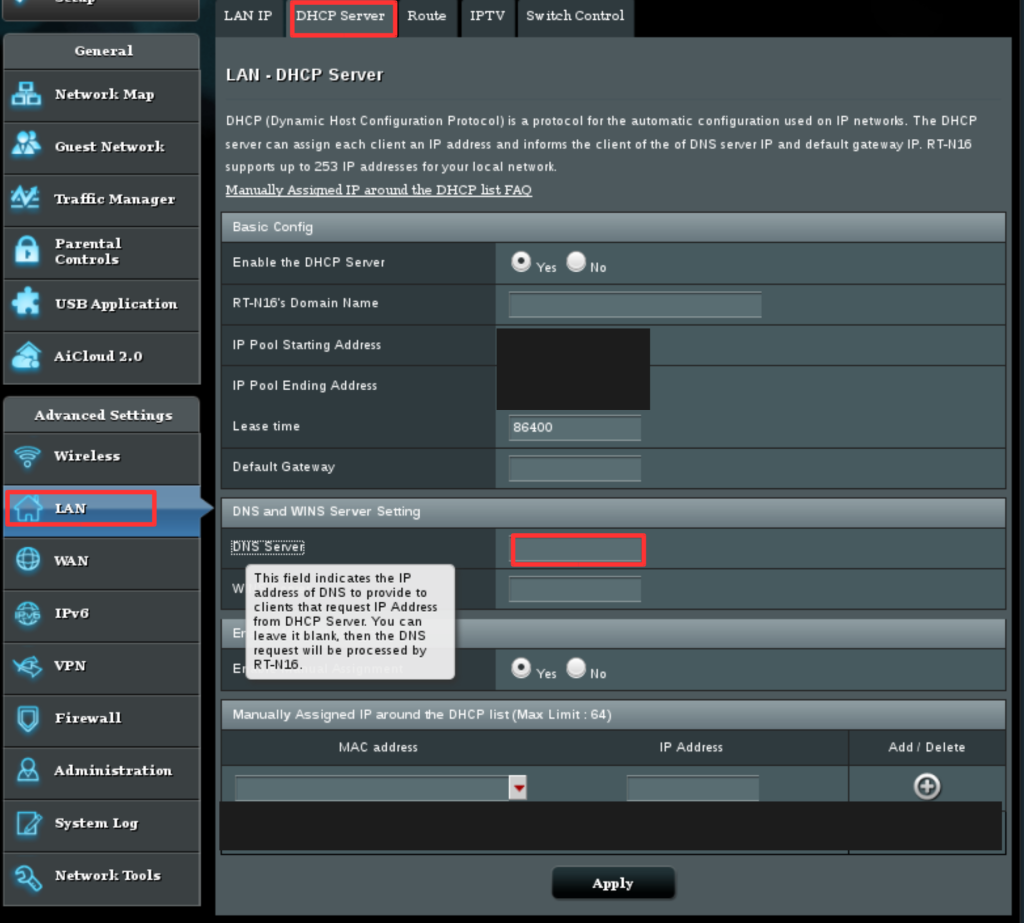
Wifi Router Setting:LAN-DHCP-DNS Server
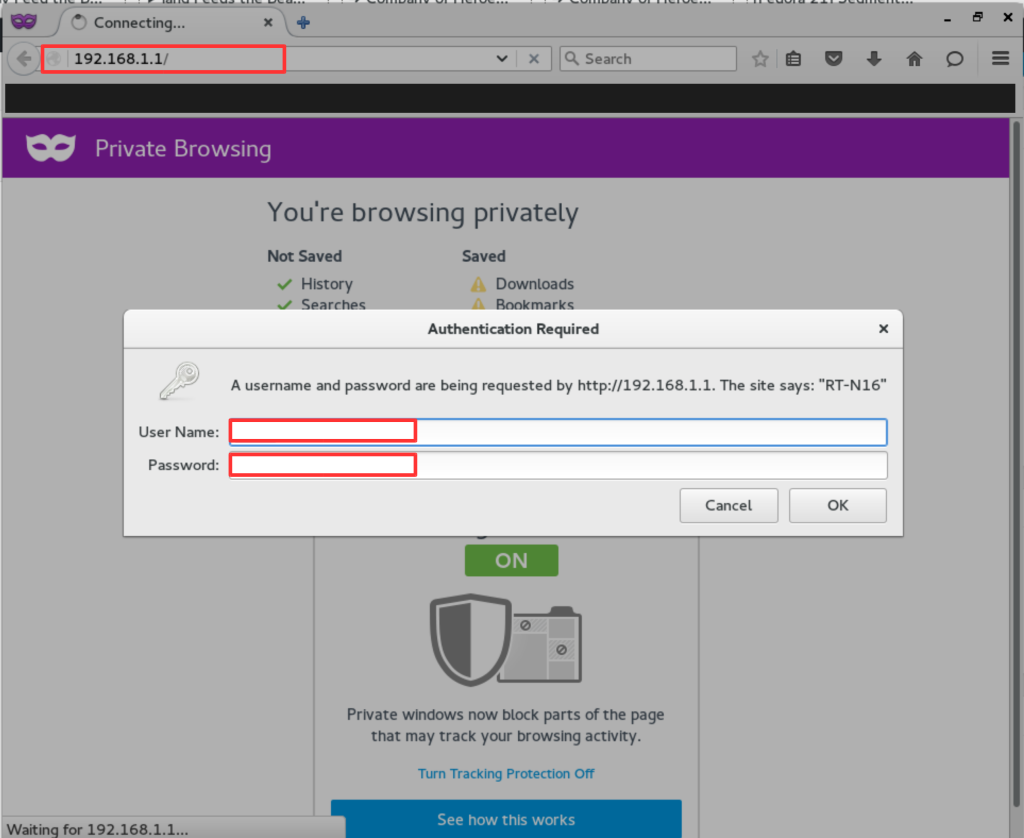
Next, open up a web browser, and key in the IP address of your router on the address bar. Open that page, and you might be prompted with a user name and password. If you did not change you router password, then the login and password should follow whatever is the default for your router model. Since this is model specific, there’s not much I can do for you here. You could google for them.
The sample shown here is the status page for my router. My router is an ASUS RT-N16. The two pages where you need to make changes are LAN and WAN settings. For now, click on LAN.

Go to LAN-> DHCP Server, and look for DNS Server setting. For my Wifi router, I could leave this part blank, and this value would default to the router’s IP address. Your Wifi router could behave differently, and you may have to put your router’s IP address here. Usually, this is how it is as default, and you probably don’t have to make any changes. Save your changes by clicking Apply or Save or whatever it is for your router.
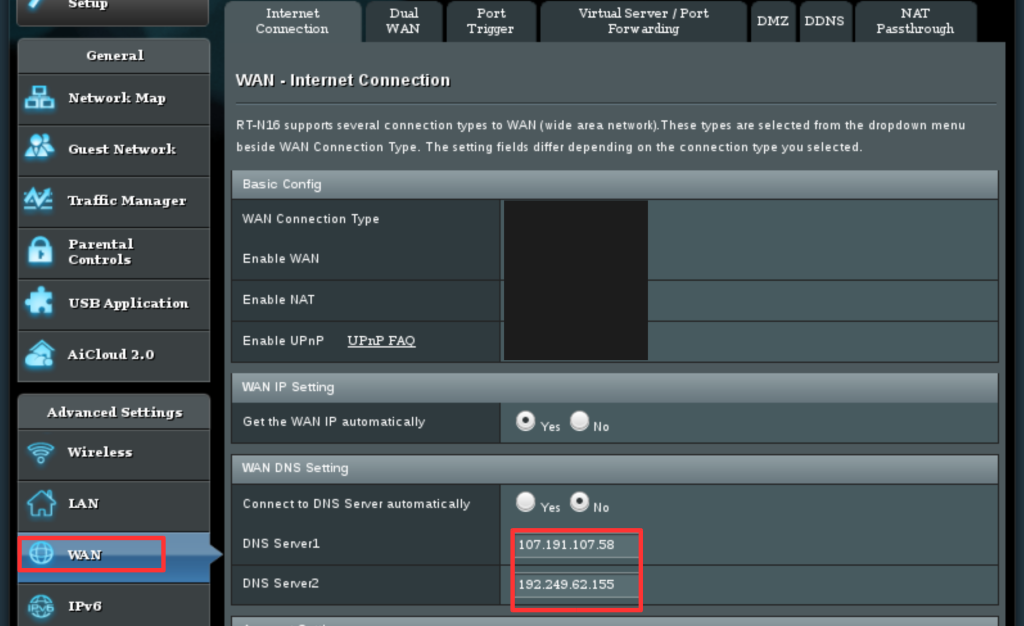
Wifi Router Setting:WAN-DNS Server
Go to WAN settings page. Look for WAN->DNS Server. By default, this is set automatically to your ISP’s DNS servers. Some folks set this manually to Google’s DNS servers.
I want you to set this to point to my DNS Servers.
- dns1.bancuh.com (107.191.107.58)
- dns2.bancuh.com (192.249.62.155)
Save your changes by clicking Apply or Save or whatever it is for your router.
Final Touches
Now, we need to make sure your changes are permanent, and persists across reboots and power cycles. Check that your changes are correct and reboot your router. Open the admin page of your router again, and check that all settings are correct.
At this point, you should also reboot all your devices using the Wifi, so that the changes propagate to all clients. Reboot every iDevices, Android devices, PCs and Laptops. This also flushes the DNS address cache on each device, so we can observe the changes immediately. (Credits goes to commenter Joe Bob for pointing this out.)
On Android devices, Chrome browser has a feature called ‘Data Saver’. This forwards all your web traffic to Google’s proxy servers. This causes ads to load anyway and bypasses the DNS Adblock that you have set up. Disable this. I am not sure of other devices.
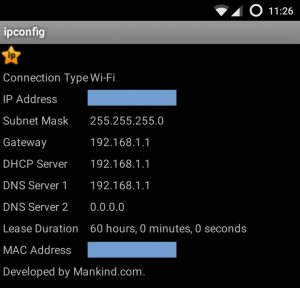
On Android, download ipconfig app (https://play.google.com/store/apps/details?id=com.mankind.ipconfig&hl=en). Other similar apps should work as well. Run it. Check that:
- Gateway = router’s IP address.
- DNS Server 1 = router’s IP address.
- DNS Server 2 = 0.0.0.0 (no entry)
Testing
Now, let’s run some tests.
Open a PC/Laptop, (reboot it if you haven’t already) and open a web browser. You should also disable any adblocking technologies that you might have installed on your browser (Adblock, Adblock Plus, Adblock Edge). Limit the scope of testing only to this Wifi Adblock. Open the following pages.
- zedo.com
- doubleclick.net
If everything is set up correctly, those pages should return a 404 page.
Open up a website that you know is laid with ads all over the place. The ads could not load, and would not appear. Their placeholder might still be there, but the ad-content is missing.
Open up YouTube, play some videos that you know have several ad-videos in between. They should no longer load.
The following testing is a little bit technical, and helps to verify if everything is set up correctly or not on your Wifi router, and PC/Laptop. Open up command prompt. Run each command as below.
- nslookup zedo.com
- nslookup zedo.com [router-IP]
- nslookup zedo.com dns1.bancuh.com
- nslookup zedo.com dns2.bancuh.com
- nslookup zedo.com 8.8.8.8
This is just to check that your DNS queries are forwarded to my DNS Adblock correctly. 1, 2, 3 and 4 should give similar result. Example as follows:
Server: 192.168.1.1 (DNS Queries sent to router, this is correct.)
Address: 192.168.1.1#53
Non-authoritative answer:
zedo.com canonical name = dns1.bancuh.com. (fake IP of zedo.com, this is good)
Name: dns1.bancuh.com
Address: 107.191.107.58 (fake IP of zedo.com, this is good)
Output of 5, is what you would get normally for 1, if you do not use my DNS Adblock. If output 1 is similar to 5, then this is not set up correctly. Example as below:
Non-authoritative answer:
Name: zedo.com
Address: 64.41.197.44 (Correct IP of zedo.com)
Conclusion
In this exercise, you have pointed client devices set their DNS server setting automatically from your Wifi router DHCP setting. You have set your router LAN-DHCP setting to set the DNS servers of client devices to point to the router itself. You have also set the router’s WAN-DNS servers setting to point to my DNS Adblock Servers.
At this point, you are pretty much done. Start browsing some ads-laden websites and see if the adblocking worked for you.
You might have some questions as to how this works, or if there are any concerns with security and other stuffs. I have another post coming up in the works for further discussions.
Till next time. Signing off.
Andy